– Is Homemade Bread Healthier?
Natively constructed bread is such a great deal better compared to locally acquired bread, it isn’t weighed down with additives, and it is exceptionally economical to make, and doesn’t take all that amount time, by the same token.
As a general rule, bread gets unfavorable criticism since grains these days are difficult for your body to process. We hear such a great amount about without gluten items so we need to ask ourselves is custom made bread better and better for us? All things considered, a great deal of the wheat crops in this nation are by and large hereditarily altered to get more cash-flow for individuals in the food business however winds up harming the overall population.
Fortunately, we are beginning to be more wellbeing cognizant and really like to perceive what we are eating instead of trust a rundown of fixings on the bundling. Natively constructed bread resembles no other, and assuming you need to set aside cash and practice good eating habits here are a couple of reasons why you should make your own bread.
Stacked with added substances and salt, this modest, mass created bread is a long way from alluring, and regardless of whether you put resources into a bread creator instead of doing it manually, the expense of the bread you will make consistently will before long be recovered as the thing you are turning it out is of a considerably more prevalent quality than anything you can purchase in the shops.
Make Your Own Bread Now !!
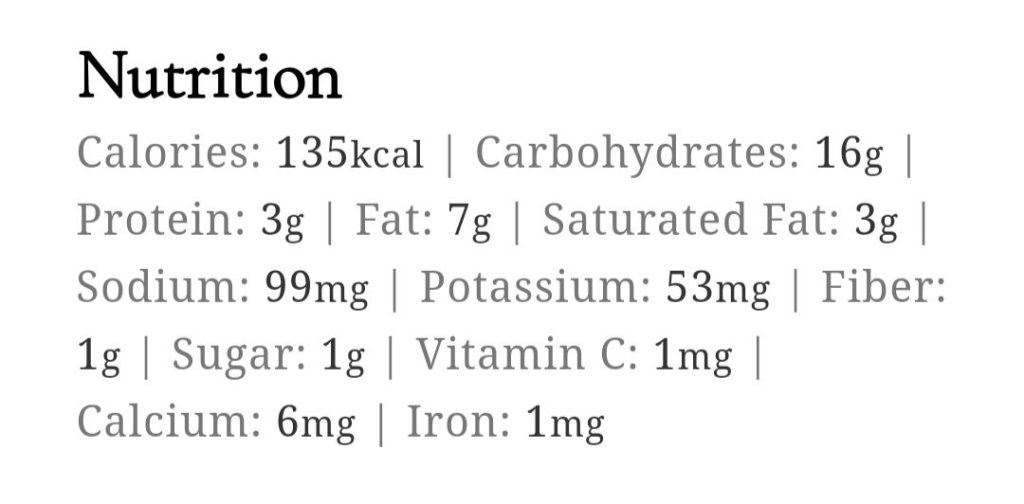
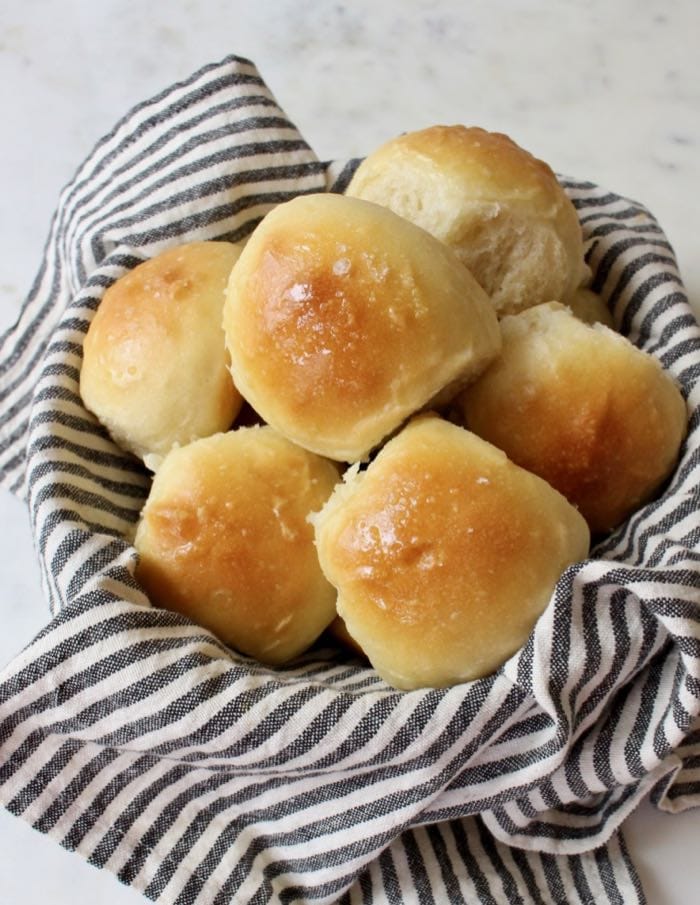
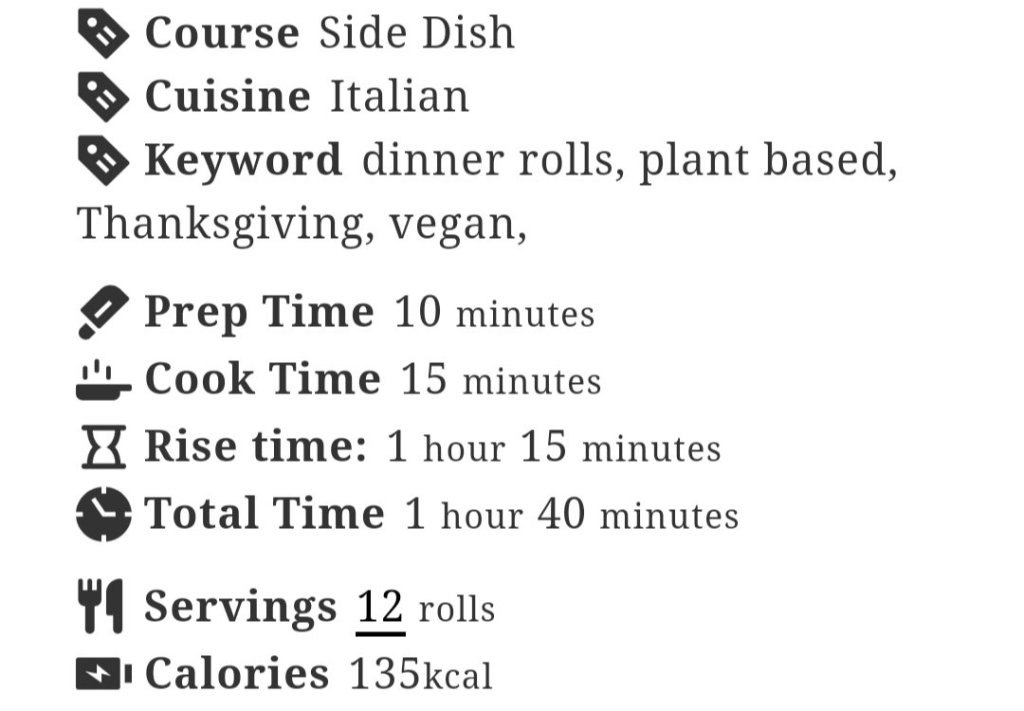
Best ever light and cushy Vegan Dinner Rolls formula Italian style, ideal for Thanksgiving, Christmas and any evening of the week.
– Tips for Making the Best Vegan Dinner Rolls :
- Make sure your yeast isn’t expired!
- Use warm, full fat coconut or cashew milk don’t worry you won’t taste any coconut at all.
- The dough should be sticky and stick to the bottom of the mixer bowl but not to the sides.
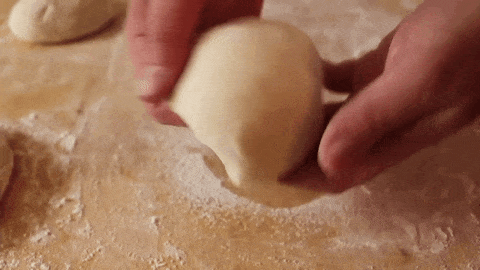
- After the first rise take good care not to overwork the dough. DO NOT KNEAD a second time or your rolls will become too dense. Simply cut it and shape by folding the dough onto itself as shown in the how to video below.
- Allow the rolls to rise a second time in the same pan you are going to bake them in until almost doubled in size.
- The rolls are done when lightly golden brown on top. I cook mine for 15 minutes inside a cast iron skillet on top of my pizza stone that lives in my oven.
- Crust Tip: In order to achieve a nice crisp crust on the bottom of your rolls make sure to cook them in a cast iron skillet or pan. It’s very important that you also allow them to cool off inside the same pan after removing from oven.
- Brush with olive oil for that shiny golden finish reminiscent of your favorite Italian restaurant.
Ingredients :
- 2 cups all purpose flour
- 1/2 tbsp instant dry yeast
- 3/4 cup full fat coconut milk warm
- 3 tbsp olive oil + more for brushing
- 1/2 tsp sea salt
- Fleur de Sel sea salt flakes for garnish
Instructions :
- Add the four, yeast and salt to the bowl of your Kitchen Aid mixer and combine.
- Pour in the coconut milk and olive oil.
- Using the dough hook lead the dough on low speed for 5 minutes or until a sticky smooth dough forms. It should be sticking to the bottom of the bowl but not to the sides.
- Cover the bowl with a tea towel and allow to rise at room temperature for 45 minutes to 1 hour.
- Dump out the dough onto your kitchen counter. Use your hand or a spatula to help it out if needed.
- DO NOT KNEAD the dough again.
- Using a serrated knife cut it into 12 fairly equal pieces.
- Use your hands (lightly oiled if needed) and carefully fold each piece of dough onto itself creating a miniature round loaf. (See the how to video above)
- Place all the rolls in a 10 -12 inch cast iron skillet without touching each other.
- Cover with the tea towel again and allow to rise another 30 minutes. (If you live in a cold climate you might need to increase the second rise to one hour or more until the rolls have almost doubled in size).
- Meanwhile preheat your oven to 400”F.
- Bake your dinner rolls in the preheated oven for 15 minutes or until golden brown on top.
- Do your best not to overcook them so the center stays fluffy and moist.
- Remove the rolls from the oven and lightly brush with some olive oil.
- Sprinkle with the sea salt flakes and allow to cool in the cast iron skillet. This step will ensure a nice crisp crust forms on the bottom of each roll.